Ryakuga Guide
Videoconferencing
In 1996, Ryakuga began to experiment with software videoconferencing using CU-SeeMe and a Connectix QuickCam.
Unfortunately, slow modem speeds made the experience a bit too erratic to be a useful communication tool. We wrote the process in as an objective of Sharing Our Future and tried out another software, iVisit, but even in 1999 we were waiting for faster connections.
In December, 2000, we joined a small group in Buenos Aires discussing the possiblity of software videoconferencing for global community networking. It quickly became an unfunded project with the Victoria FreeNet supplying a lot of impetus.
After experimenting with Cu-SeeMe, we switched to iVisit and with broadband connections, we engaged in group discussions with as many as ten participants.

The experiments continue on the west coast of Canada and here on the west coast of Newfoundland as well. During the RuCa Radio project in St. John's we simultaneously webcast and videoconferenced with a group at a CAP centre in the Maritimes.
With great support from iVisit, Ryakuga now has conference rooms available for community group discussions. Our experiments in videoconferencing focus on group experience.
We have webcams on loan to community groups in Newfoundland, France and Russia.
In 2003 our software videoconferencing experiments has three focus areas. One is to continue development of our virtual (project management) office concept and an other is to expand our definition of simulcast to include FM Radio, webcasts, phone-in/outs and videoconferencing.
All focus areas are related, of course, and the commonality is the group. The third focus is to develop a interactive virtual group concept which will be facilitated and informed by awareness of ergonomics and group dynamics.
Software videoconferencing is an important component of Enlarging the Circle.
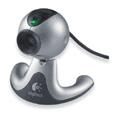
The QuickCam Webcam
There are all kinds of cameras and interfaces you can use for videoconferencing, but Ryakuga has chosen the Logitech webcam. Several years ago Logitech bought the ground breaking Connectix QuickCam, so we're sticking with the same technology.
We prefer the Pro 3000 and the Pro 4000 (they work on Macs as well as IBM clones) but cheaper models include the Zoom and the Web. One important feature they have in common is a built-in microphone which simplifies installation and use. All models require a USB connection which seems to be universal on the modern computer.
Installing the QuickCam
1.Don't connect the QuickCam until you are asked. Insert the installation CD. If the setup screen doesn't appear, go to the taskbar, click start, and then run. Type D:\SETUP.EXE and press the enter key.
2. Follow the onscreen instructions. After you reboot your computer towards the end of the installation, you will be asked to connect the QuickCam cable to the USB port. Continue to follow instructions.
3. To launch the QuickCam software, you can click the QuickCam icon in the Windows Quick Launch bar. Or you can click the Start menu in the Windows Taskbar , then select Programs, Logitech QuickCam, then launch Logitech QuickCam software.
4. Use the Logitech QuickCam software to adjust your video and audio settings.
Installing iVisit videoconferencing software
The creator of iVisit is Tim Dorsey, who not by chance, was also a creator of the original CU-SeeMe software from Cornell University. iVisit has been around since 1997, constantly improving with age :)>
iVisit now is cross-platform, stable and an easy free download from ivisit.com
Follow the directions to install iVisit. It will put an iVisit link on your desktop.
There are a variety of ways to connect directly to another iVisit user but we are concerned here with using a videoconference "room". An advantage of a room is it is password protected (no lurkers or uninvited participants) and it will allow up to 12 participants.
Connecting to the iVisit server
1. We assume you are online with a high speed connection and your webcam is plugged into your computer and your speakers are attached and turned on with a suitable volume.
2. Click on the iVisit link on your desktop.
3. Arriving at the iVisit server, close the entering screen and, if necessary, under window, open directory - mode: server.
4. Ryakuga has two sites. In the main directory; click iVisit World; then click } USERS, and then click Ryakuga.
5. Enter the password. Submit.
6. Highlight Lounge. Click on the green arrow/two stick figures button to enter. In directory window, click on the guest's name to see their video.
7. If the left button is yellow, other ivisit users with your address bookmarked will have to ask to enter. Green is autoaccept and red is do not disturb.
Connecting directly to the Ryakuga Rooms
1. Insert the Ryakuga Rooms floppy and drag the file to your computer's desktop.
2. To launch the iVisit software, the QuickCam software and enter the Ryakuga Rooms, simply click on the ryakuga.ivb file on your desktop. You are now in the room.
In the Ryakuga Rooms
1. If you don't see your own webcam, under window, click local AV window.
2. Click on the windows of other users in the Guest List box to enlarge their picture. The optimum iVisit windows at present are about 160X120.
3. Click on the talk button (or press the control button on your keyboard) to talk. Remember, it's like CB radio :)>, press talk only to talk.
4. Audio can be a problem if the mic level is too high in the red and you get distortion. You may have to adjust levels under settings - audio device.
5. A "woodpecker" noise has been noted with Windows XP. Assuming your mic and sound card are okay, you can try turning off full duplex in your settings. Other suggestions include switching to the ADPCM codec and raising your bandwidth caps if you can.
More on Windows XP audio problems
IVisit suggests the following possibilities:
1. Use a microphone.
2. Switch to ADPCM codec.
3. Reinstall sound drivers.
4. Raise bandwidth caps 500/500.
5. Do you have a low end sound card?
6. Turn off full duplex.
There is no doubt audio is the biggest problem. Our early CU-SeeMe tests showed you could get video with a dialup but the sound was awful. Connecting without a video camera and just audio seemed to make no difference.
The other factor in audio is to get your levels right - digital audio is very fussy - it breaks up if it's too high and gets gravelly if it's too low.
Connect to self
1. Click on your own name in a directory.
2. Enter your own IP address.
3. Push to talk.
During the Enlarging the Circle experiment of weekly group meetings, we have agreed that if we suspect problems, we will go to the room about 15 minutes early to sort things out.