Using video as a means to share our experiences works a lot better if it is controlled by the people involved in the process, rather than being brought in from outside.
So the first step is to locate equipment. In some communities this might mean going to the local community television group or a school or college. But camcorders are pretty common nowadays; you might even own one yourself.
Whatever video is collected each month can be given to the SOF coordinator as part of the regular report.
So what are we talking about?
1. Short scenes of SOF activities. Either put the camcorder on a tripod or hold it steady for 30 second "snapshots".
2. Your answers to the questions for Community Communications faciliators. But basically you can share your experiences; describe what really worked; what barriers you met, and what you would do differently.
3. Comments from anybody else who participates in SOF activities, including youth, parents, community people; staff, and administrators. There are questions for the community and for youth but what is important is simply to hear what these people have to say about their experience of Sharing Our Future. Please identify the speakers on paper.
It's not necessary to record miles of tape. Try making it a regular part of your activities at a certain time each week.
4. A good way to begin is to brainstorm a list of people that you will be able to talk to. Some will be too shy. But you will be surprised how many people are willing to share their experiences if they know they will be treated with respect. Also some people like to be coaxed :)>
We are using video as our main tool to collect data, so the guide also includes a few tips on using this medium as unobtrusively as possible. Respect for the person being interviewed is a primary principle.
The interview guide is designed to be flexible; it "guides" the interviewer but also permits adaption of questions or even spontaneous chat.
Different questions should be prepared for each category of interviewees.
We utilize both individual and group interviews. In addition, we are interviewing people who may be considered "key informants" having intensive knowledge community development processes in western Newfoundland.
Our interviewers are the SOF co-ordinator and the steering committee (also the evaluation committee) member from Sir Wilfred Grenfell. It is important that the interviewees feel comfortable with the interviewers. The people asking the questions must be familiar with the program so they interact with the interviewees.
Ask simply-worded, open-ended questions. They should stimulate people to speak (use describe, tell us about...) Don't use close-ended questions which can be answered by "yes" or "no".
Keep each question to one subject. Don't ask two or three questions at once.
Don't ask leading questions such as - "tell us why SOF is such a great success in this community."
Using video in a process like this is a bit of a balancing act. You will be dealing with people who are nervous, worried they are being judged, and probably not used to being on-camera. You want to be as unobtrusive as possible.
(These are lots of reasons why the community communication facilitators should use the video data collection tool themselves. It's less threatening, particularly when used regularly.)
However, there is no sense in using video if it isn't of a minimal "technical" standard. You have to be able to see a picture and hear the sound. If possible, use a lavalier (clip-on) microphone and a video light.
The best procedure is to establish an "interview set" and bring your interviewees to it. This saves time and gives you a chance to test your equipment. Interviewees who are nervous become more so if they have to watch equipment being set up.
The camcorder should be placed on a tripod so you shoot over the shoulder of the interviewer.
We must take care to demystify both the video and the participatory evaluation process. Be casual and stress that this is an ongoing process to improve the program and help others who want to initiate a similar program.
The interviewer should facilitate a brief chat to set the interviewee at ease. Check your audio in your headphones and the picture on a TV monitor, if possible. Start recording during the chat.
If the interviewee is really nervous, the camera operator can leave the room. Usually the interviewee forgets about the camera in a few minutes. All concerned should try for a relaxed-as-possible atmosphere.
One of the advantages of using video in an evaluation data collection of a process is that you can capture emotion or feelings as well as words. Also in a discovery process, you can collect much more information than if using say, a questionnaire.
Please feel free to be spontaneous when asking questions. This is just a guide, not a rule book. After all, the name of this process is sharing our voices.
If video cameras are not available, try getting people to write personal letters describing their own experiences. Ask them to "tell their own stories." Tell them not to worry about being grammatically correct. Relax.
Questions for Community Communications Facilitators
Questions for the Community
Questions for Youth Volunteers
For best results use a tripod, external microphone, headphones and a television monitor to see the picture. But we make do with what we have. One tip is, if you don't have a tripod, put the camcorder on something steady. Bean bags make great tripods.
If you don't have an external mic, choose a quiet place to record and get the camcorder as close to the person speaking as comfortably possible.
And - make sure you have enough light. Don't place your interviewees in front of a window or bright, white wall.
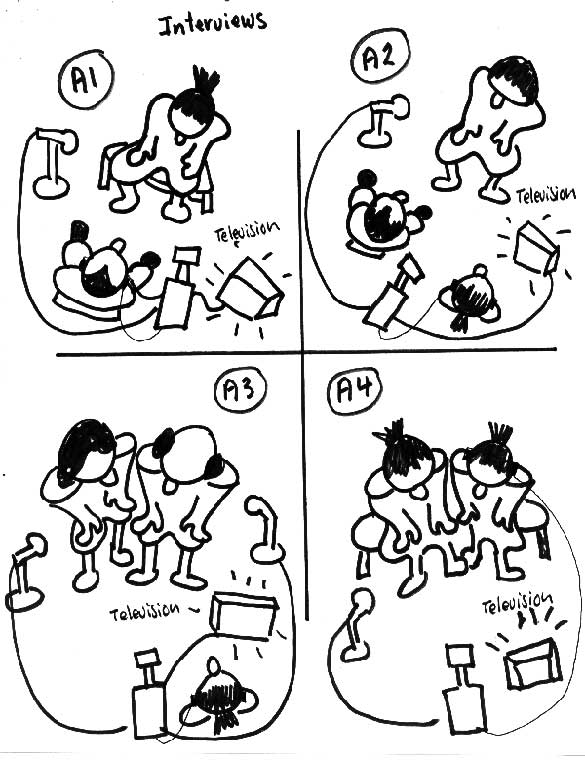
A1- The camcorder placed close to the interviewer. Start it recording before the interview; have a chat and, when the interviewee has forgotten about the camcorder - start the questions.
A2 - The interviewer and interviewee can have a chat while the camcorder operator is setting up. The camcorder is placed behind the shoulder of the interviewer. If the interviewee is nervous, the operator can even leave the room. But make sure you have enough tape and all batteries are charged up.
A3 - Sometimes, if the interviewee seems really uncomfortable, it may be necessary for the interviewer to sit real close and hold hands. It's important for the camcorder operator not to fall asleep at the wheel and record a picture only of the person listening.
A4 - Holding hands without a camera operator is a bit difficult. Set the camcorder recording a visual of both people and - cross your fingers.
Have fun! This is a very useful way to ensure that everybody's voice is being heard but it's not supposed to be too serious.
Click here to link to the diagram for interviewing styles.