When making community radio, it is essential to get as many of the community participating as possible, either by phone-ins or open studio policy or by taking portable transmitters to the people.
The basic technical components are the transmitter, antenna, audio mixer, microphones, mic stands and a home stereo cassette deck.
Ryakuga offers two systems - one based on a twenty watt FM stereo UNESCO transmitter and the other built around a Ramsey miniature FM stereo transmitter.
Both systems have adjustable frequencies so not to conflict with established transmissions in your community.
The purpose of grassroots community radio is to support and promote local cultures.
It can be tuned anywhere in the 88 - 108 MHz FM band. The power of the transmitter is probably less than 100 milliwatts but with a proper antenna, it seems to be capable of transmissions exceeding a mile radius.
As Ramsay advise: "Remember that the field strength of a signal is determined as much by the antenna as by the RF output of the transmitter itself."
The transmitter has right and left channel audio inputs (line level - as from an audio mixer or home stereo cassette deck); phono plug (RCA) output to the antenna; a small whip antenna for short distance, and an off/on switch (the unit is on when the switch is pushed in/off when out).
It is powered by 9 volts DC, either from a battery or an AC adaptor.

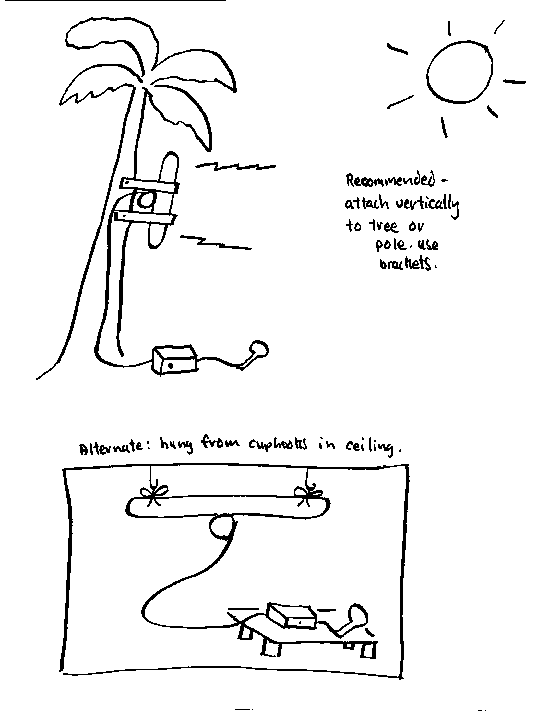
So it's a good idea to get the antenna as high as possible. The supplied antenna is a UNESCO design meant to be attached vertically to a pole (for short distances or in hilly country it may also be suspended horizontally).
Attached to the antenna is 50 feet of cable so you could transmit from a downstairs location with the antenna in the attic or transmit from outside in the yard with the antenna up in a tree.
For short distances you can just hang it horizontally from cup hooks screwed into the ceiling.
Please be careful with all the radio equipment - it's a bit fragile so take care when making connections and dismantling.
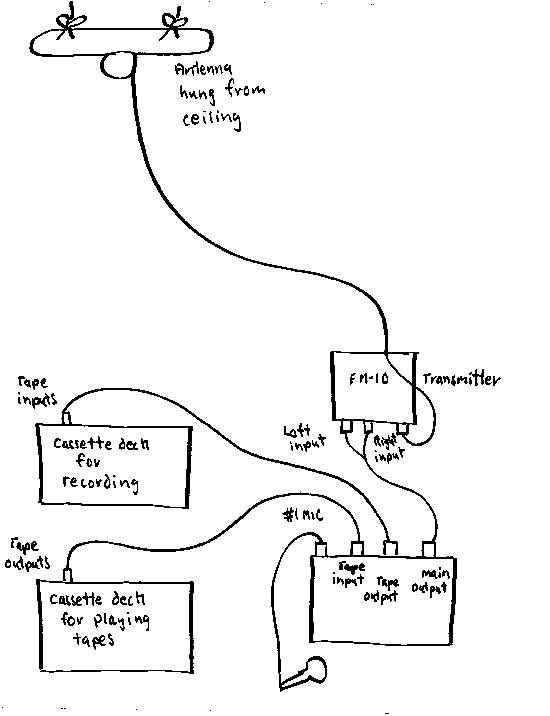
At the end of the cable attached to the antenna is a phono or RCA plug which is inserted into the antenna plug on the transmitter.
You will need up to five power outlets for this set up - ac adaptor for the transmitter; audio mixer; one or two cassette decks and a light for reading. Use a power bar.
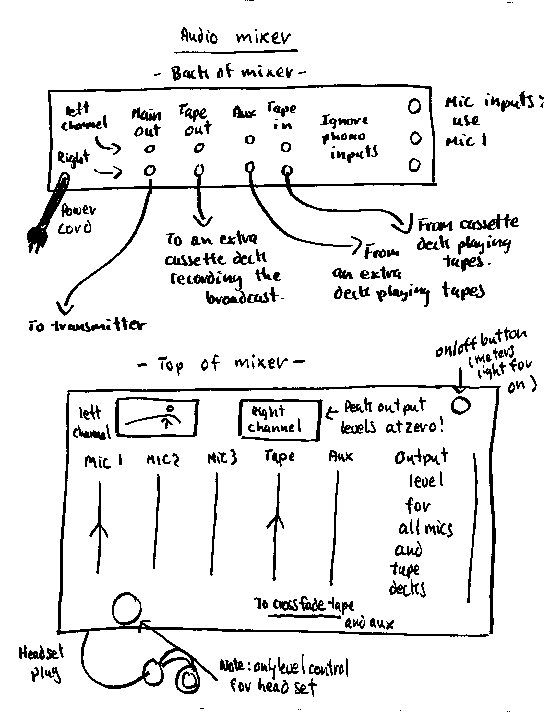
Plug in all the equipment but don't turn it on yet. Plug the mic into the channel 1 jack on the back of the audio mixer. Take a double RCA cord and plug into TAPE IN on the back of the mixer and line output on the back of the cassette deck.
Ignore this paragraph if you have only one home stereo cassette deck. If you can locate two cassette decks, it's a good idea to use one to tape your broadcasts. Take another double RCA cord and plug one end (right and left plugs) to TAPE OUT on the back of the mixer and line TAPE INPUT on the back of this deck.
Take yet another double RCA cord and plug into MAIN OUTPUT on the back of the audio mixer and right and left channel in on the transmitter. It doesn't matter what color is right and left - the cords are color coded so you can make sure the right and left channels on the mixer go to the right and left channels on the transmitter.
Cassette tapes are very difficult to cue up to the beginning of the song - it should be done before your broadcast - maybe on a ghetto blaster in the next room.
That's it for setup.

The meters measure output in the right and left stereo channels - the same meters for your voice (mic) and the music (cassette deck). You can "ride" the levels of your voice (first slider on the right) and the music (slider 4).
Nobody should be concerned with sounding professional but it's probably a good idea if, during a broadcast, you try to avoid "dead air" when there's no sound. Try speaking over the music at a low level while you introduce it and bringing it up louder after you finish speaking.
But community radio should be live radio; try to have local musicians perform in the studio. Interview the people or let the people interview each other. Invite people from the community to voice their opinion.
The only control on the transmitter itself is a push button on/off switch - push it once; it goes in for on; push it again and it comes out for off.
You only need one home stereo cassette deck with line out plugs - if a boom box has output plugs, they are usually amplified signals for extra speakers and cannot be hooked up to the mixer.
If you add another cassette deck and connect it to the AUX input of the mixer, then you will be able to fade out one recorded signal while bringing up another. There's a fader control at the front of the mixer - experiment off-air.
Also, while one deck is on-air, you could cue up (find the start of the songs) your tapes on the other deck.
If you add a third cassette deck and hook it up to the main output of the mixer, then you would be able to record all your programming.
It's helpful to have an FM radio closeby, but turned down low to avoid feedback, just so you know what's happening on-air.

2. Play tapes in the tape deck.
3. Push up slider one on the mixer to talk (the output slider on the right should be pushed about halfway up). After talking be sure to pull down slider one so people talking in the room won't go on-air.
4. Watch the levels on the mixer and keep peak signals below zero. Don't distort the sound.
5. Don't swallow the mic: speak across it from a few inches away.
2. No swearing on-air.
3. No distortion of radio transmission signal - pull down sliders until peaks are below zero on the meters.
4. You must keep a program log. Turn it in to the co-ordinator to be signed.
5. First to sign in for slot on schedule is first to make program.
6. Pull plugs on equipment when finished programming.
7. Programs must end by 11:15 PM so generator surge won't hurt equipment.
8. Remember this ain't no toy - it's a real radio station.
9. Please be careful with the equipment - it's all personal stuff loaned to y'all. Thanks.
READING BROADCAST NEWS
1.Always pre-read your copy.
2.Correct all spelling and grammar mistakes.
3.Use your own 'phonetic' spelling above any word you have difficulty reading during pre-reading.
4.Underline any word you want to emphasize.
5.Use one or more slashes to denote pauses of different length.
6.Time complete story with pen at top of the story after pre-reading it out loud.
7.Use your microphone effectively to suit your voice (see sound section).
8.Speak in a conversational voice.
9.Noiselessly hold your script above the table. But don't get in the way of the microphone.
A problem with many portable consumer cassette decks is the automatic gain control (AGC) - an automatic volume control which suppresses loud noises and turns up low sounds. You have little control over background noise and during editing you end up with a lot of tape hiss. If you use an audio mixer between your recorder and mics, you can control your mixer volume levels. (This can reduce the hiss but it won't get rid of it.)
Be careful you understand the pickup pattern of the microphone you are using. Omnidirectional mics pick up sound in all directions while cardioid (picking up sounds from a distance) mics are unidirectional and pick up sounds in an apple shaped pattern with the mic as the stem.
When using a hand-held mic, loop the cable around your hand and be aware how much lead cable you have. Outside in windy conditions, try to use a wind sock/screen. Hold the mic closer to your mouth in noisy areas but hold the mic low enough to speak across it. When interviewing someone, remember to move the mic back and forth from your mouth to the interviewee's depending on who's talking.
Attach a lavaliere (clip-on) mic to the surface of your clothes six inches below your chin. Don't let it rub against clothes or jewelry. Use a lavaliere for each subject. The most common problem in lavaliere use is forgetting to switch (also clip) it on.
Place the desk mic to the side of the subject, pointed at the collarbone so he will speak across it. Watch out for mic handlers and put a soft pad under the mic if there is liable to be table noise (pencil tapping, etc.). Distance for omnidirectional is six inches to a foot while cardioid is about 17 inches to two feet. If you share a number of mics among a panel, keep the mics three times as far apart as any mic is from its subject. Again, monitor the results and try a recorded voice check prior to "live" taping. When using an FM radio as a monitor be careful the volume is low and the speaker not in the mic pickup pattern to avoid audio feedback.
You might solve some sound problems by hanging a mic from the ceiling above the subject. Be careful of electrical interference and separate the mic cables from AC wiring. If you have to cross an electrical cable with a mic cable, do so at right angles.
Try to keep cables out of traffic areas, but if they are, tape the cables to the floor.
Taking Levels
Levels are taken to let the producer/engineer adjust your mic volume level. By taking a level, the producer/engineer can tell if you are on/off mic, too loud or soft or producing popping and sibilance. Read your actual script, take your on-air position in front of the mic and continue reading/adlibbing until the producer/engineer is satisfied.
Remain silent waiting for a level before a mic or with lavaliere clipped on.
Wait patiently and alertly for an oral or visual sign to take a level. After the signal, move to the exact position with the same posture you will use on air and read or speak exactly as you will on-air. Use the same vitality and emotion you intend to use performing. Remain alert for any hand signals intended to modify your performance. Continue to speak until you are signalled to stop.
General principles should be understood for effective use of studio microphones.
1. Speak in a normal, conversational voice, neither too loud nor too quiet. For average volume, the speaker should be about the distance of two stretched hands from the omnidirectional microphone (some experts advise six inches). A weak voice needs to be closer and a strong voice further away. It is good practice to have the engineer check the announcer's volume level to determine proper mic distance. Balance among voices is essential when several people are using the same mic.
2. Speak across the mic. Never puff or blast directly into the mic.
3. Maintain effective distance from the mic; moving back and forth changes the volume.
4. Handle scripts noiselessly. Make sure the pages are unstapled and in order. A good procedure is to read to the bottom of one page, meanwhile quietly sliding it to expose the first few lines of the next page. When a new page is begun, either drop the completed page to the floor or carefully sweep it to the back of the script.
NOTE: Some mics, such as the Electro-Voice 635A, are omni- directional (360 degrees) microphones while others are directional; make sure you know the difference.
COMMUNITY NEWS
News is what people are talking about each morning at the store; gas pumps; beauty parlour; barber shop and coffee break.
News is ...
1. Important ...
2. Interesting ...
3. Controversial ...
4. Unusual ...
5. Timely ... happening right now.
6. Close by ...
... for members of the community.
Practitioners should ensure that they are really communicating - i.e., listening as well as talking.
1. Reporteros populares (reporters of the people) - This idea is borrowed from the Sandanistas in Nicaraugua; other places call these volunteers correspondents. Instead of relying for your news on a few professionals paid by big companies, you hear what's really happening from lots of ordinary people talking and listening to their peers. These reporteros communicate with the community using portable tape recorders but it's also important to bring the community to the studio. Responsibilities include listening and talking to as many people as possible; coming up with interview ideas; being aware of what the community is talking about; fills out assignment sheets; having mic skills, and knowing how to operate a portable tape recorder.
2. Engineer - Responsible for protecting the equipment against damage - either in handling or from, for example, electrical surges of generators; making sure the transmission signal is not distorted; operate the audio mixer balancing the levels from mics and cassette decks; operate the tape decks, and try to ensure there is as little "dead air" as possible.
3. On-air people - Responsible for not-swearing or acting the fool on-air; works with the engineer to ensure sound quality and no dead air; developing mic skills; cueing up tapes before the broadcast; sign up on station's program schedule; filling out a program log and having it signed by the program co-ordinator before the broadcast.
4. Program co-ordinator - Responsible for the smooth operation of the radio station; distributes assignment sheets and program logs; signs program logs before broadcasts; makes up, hangs up and checks daily program schedules; generally knows whats going on, and helps staff with skills training.
5. Participants - The whole community should be regarded as participants in grassroots community radio. The word is "All the Voices".
1. Begin with a budget meeting - bring in facilitators and write on flip chart paper as many story ideas as possible.
2. Hand out and describe assignment sheets and program logs. Point out and explain the daily program schedule.
3. Demo tape deck/mixer/transmitter/antenna. Give each person and opportunity to operate the equipment and speak to the mic.
4. Hand out tip sheets on equipment operation.
5. Give participants fifteen minutes to choose assignments off the flip chart paper (or make up new ones). They should then show their assignment sheets to the programming co-ordinator.
6. Participants choose times they want to broadcast on the daily program schedule and contact to make appointments with the people they want to interview. It's probably simpler to do live interviews rather than try to pre-tape.
7. Before going on-air, participants fill in a program log and have it signed by the program co-ordinator.
8. After all programs have been aired, it's probably a good idea to have a brief followup meeting to share experiences.
| TIME IN | PROGRAM | TIME OUT |
Assignment:
Interviewee:
Time of appointment:
Place:
Deadline:
Scheduled to be aired: